Final code structure overview
The code for this second part looks mostly similar to the first part with some added files in the streamlit directory. Sample code repo here.
sample-streamlit-deploy
    .github/workflows/
        docker-push.yml
        update-streamlit.yml
    .gitignore
    code_package/
        streamlit/
            pages/*
            util/
                google_oauth.py
            Home.py
            requirements.txt
            start.sh
        util/
            cloud.py
    Dockerfile
    Makefile
    docker-compose.yml
    environment.yml
Overview
In a company setting, we may want to build streamlit apps which deal with sensitive information. In that case, we have to think about the security of our app. There are a few layers we can consider:
- Network-based access - if a company or office building has a VPN or specific network they use, we can restrict access to requests coming from the relevant IP addresses. This is necessarily sufficient alone because if someone can get access to the VPN or network, then they have unmitigated access. However, it’s a good first line of defense.
- Google Oauth login - we can gate page content behind a login widget which requires login through Google account. I’ve also explored streamlit packages that allow for homemade authentication with credentials stored in AWS, but these felt like more work for a less secure solution.
- Custom domain - we can serve the app at a custom domain name instead of the default alb one. This doesn’t necessarily improve the security of the app itself, but it helps ensure non-technical team members don’t grow accustomed to clicking long, complicated, and potentially dangerous URLs. It also enables the next security measure:
- Certificates - once we have a custom domain attached, we can create certificates to secure traffic to our app and serve over https instead of http. This prevents certain kind of attacks I’m less familiar with, but is generally considered to be useful.
Let’s take a look at how we’d set these up!
Network-based access
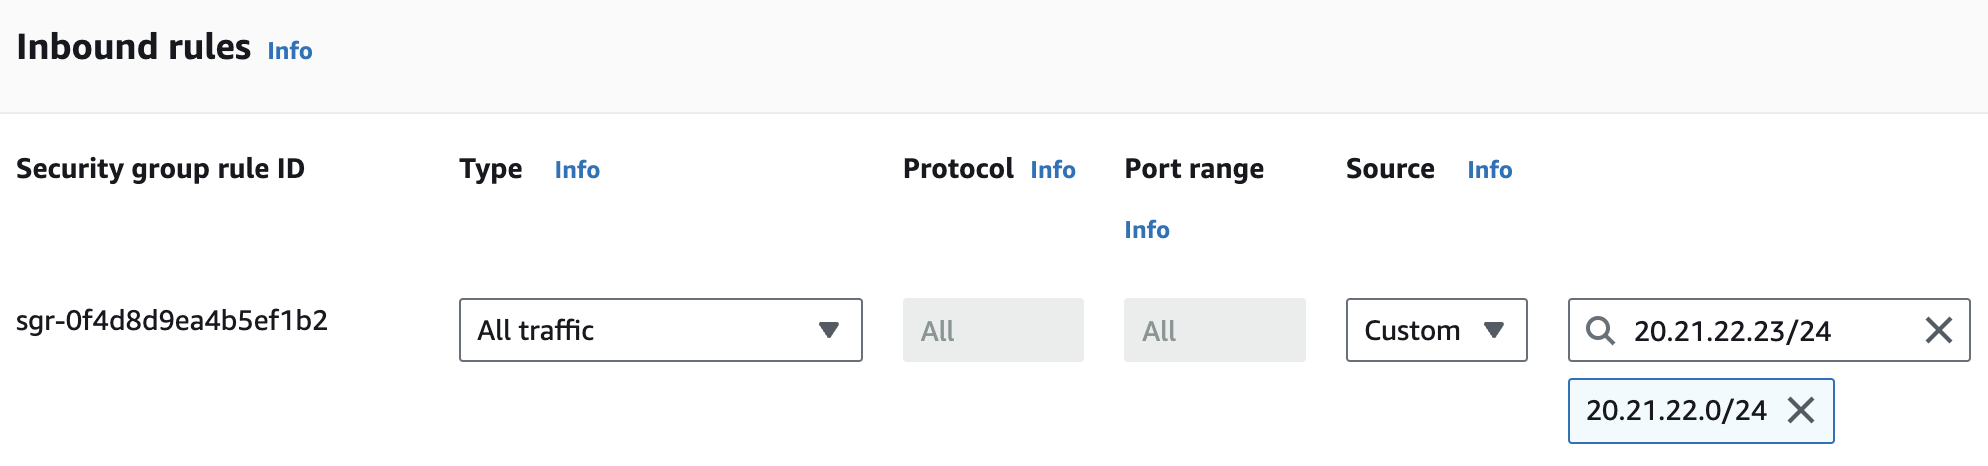
Go to the page for streamlit-alb-sg and click Edit inbound rules near the bottom of the page. Previously when we set this up, we allowed for traffic from Source: Custom 0.0.0.0/0. Before we change this, we need know what the actual allowed range of IP addresses is for our VPN or in person network. This may look something like 20.21.22.23/24. Then you can just set the rule to use that instead of 0.0.0.0/0.
Google Oauth login
I decided to use the existing streamlit-oauth (code here) to simplify implementation. Before writing our actual auth code, we have some setup to do. As a prerequisite, you will need access to a custom domain name for this (and for setting up certificates later as well). If this is being done in a company setting, you’ll likely have an internal tools-specific company domain you can use. In this case, you should make sure your GCP account is part of a company organization, which allows you to designate your GCP app credential as “internal” vs “external”. This makes permissions very simple, as by default, OAuth will allow all email addresses in your organization and none others.
If you can’t use a company organization, then you can make a “external” app, but just keep it in test mode where it’s only accessible to a whitelist of email addresses. In either case, first, we need to set up the OAuth client ID in GCP. Generally following these instructions, navigate to the GCP console, make a new project, and create a new OAuth client ID. I’ll show instructions for a “external” app as these seem to be a superset of what’s needed for “internal”.
If you’re making an “external” app for the first time on an account, you’ll have to create a Consent screen. In doing so, I used the following settings:
- App name: Varun Streamlit Deployment
- User support email: my personal email
- Logo, app home page, privacy policy link, terms of service link: left blank
- Authorized domain: whatever personal domain you own, I’m just using my personal site URL
- Developer contact: personal email again
- Scopes (on next page): all left blank
- Test users (on following page): just personal email again for now
Once this is created, you can go back to making the OAuth client ID by going to the Credentials page in the sidebar. Click Create Credentials then OAuth client ID. In the settings, choose Web application, then set a name (like Varun Streamlit Deployment) , then for now, just set http://localhost for the redirect URL (we’ll add the remote URL once it’s linked to the site). Once you’ve done so, you’ll get a popup with your API client info (present below but cropped out for security):
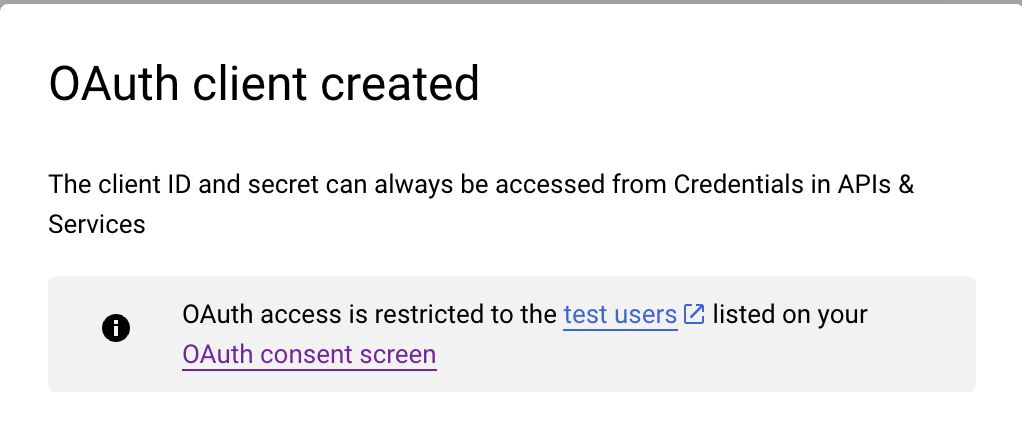
We need to store these secrets somewhere securely where our app can access them. Given that our app is deployed in AWS, I decided to store them in the AWS Parameter Store. I used the link in the popup to download the client info as a JSON, then went to Parameter Store in the AWS console and created a new parameter. I set:
- Name: /streamlit/oauth
- Description: streamlit oauth API info
- Tier: standard
- Type: string
- Data type: text
- Value: (the text of the downloaded client info JSON)
Next, let’s write code to access this parameter. In a new file code_package/util/cloud.py:
import boto3

def get_aws_parameter(key):
    session = boto3.session.Session()
    ssm = session.client("ssm")
    response = ssm.get_parameter(Name=key, WithDecryption=True)
    return response["Parameter"]["Value"]
To get this to work, we’ll need to do a couple things. First: we need to add boto3 to our environment.yml:
name: env_name
channels:
  - defaults
dependencies:
  - python=3.11
  - boto3
  - pandas
Second: we need to make sure our AWS credentials are being copied into the docker container so we can actually access things in the AWS account. In our docker-compose.yml, we can add our ~/.aws as a second volume to attach as follows (for both streamlit and streamlit-local):
		...
		volumes:
      - ./code_package/:/app/code_package/
      - ~/.aws/:/root/.aws/
		...
Third: now we’re actually importing code from outside the streamlit directory into the streamlit script, so we have to make sure the code_package package is in the python path. We can do this with a new line added near the end of our Dockerfile:
...
ENV PYTHONPATH "${PYTHONPATH}:/app/code_package"

COPY code_package ./code_package
Fourth: we can add a .gitignore file to make our lives a little easier, adding just this line for now:
__pycache__/
Then, we can write our authentication code using the streamlit-oauth package. First, let’s add it to the streamlit requirements.txt:
streamlit
streamlit-oauth
Then, loosely following examples in the package repo, we put the following code in code_package/util/streamlit/google_oauth.py:
import streamlit as st
import os
from streamlit_oauth import OAuth2Component
import base64
import json
from code_package.util.cloud import get_aws_parameter

AUTHORIZE_ENDPOINT = "https://accounts.google.com/o/oauth2/v2/auth"
TOKEN_ENDPOINT = "https://oauth2.googleapis.com/token"
REVOKE_ENDPOINT = "https://oauth2.googleapis.com/revoke"
REQUIRE_OAUTH_IN_LOCAL = False

def oauth():
    if os.environ.get("LOCAL_STREAMLIT") and not REQUIRE_OAUTH_IN_LOCAL:
        return

    if "auth" in st.session_state:
        if st.button("Logout"):
            del st.session_state["auth"]
            del st.session_state["token"]
            st.rerun()
    else:
        oauth = json.loads(get_aws_parameter("/streamlit/oauth"))["web"]

        if os.environ.get("LOCAL_STREAMLIT"):
            redirect = "http://localhost:8501"
        else:
            redirect = oauth["redirect_uris"][-1]

        # create a button to start the OAuth2 flow
        oauth2 = OAuth2Component(
            oauth["client_id"],
            oauth["client_secret"],
            AUTHORIZE_ENDPOINT,
            TOKEN_ENDPOINT,
            TOKEN_ENDPOINT,
            REVOKE_ENDPOINT,
        )

        result = oauth2.authorize_button(
            name="Continue with Google",
            icon="https://www.google.com.tw/favicon.ico",
            redirect_uri=redirect,
            scope="openid email profile",
            key="google",
            extras_params={"prompt": "consent", "access_type": "offline"},
            use_container_width=True,
        )

        if result:
            # decode the id_token jwt and get the user's email address
            id_token = result["token"]["id_token"]
            # verify the signature is an optional step for security
            payload = id_token.split(".")[1]
            # add padding to the payload if needed
            payload += "=" * (-len(payload) % 4)
            payload = json.loads(base64.b64decode(payload))
            email = payload["email"]
            st.session_state["auth"] = email
            st.session_state["token"] = result["token"]
            st.rerun()
        else:
            st.stop()
Then to enable OAuth in 1_First_App.py, we can add a call to the oauth function as follows:
import pandas as pd
import streamlit as st
from code_package.streamlit.util.google_oauth import oauth
oauth()
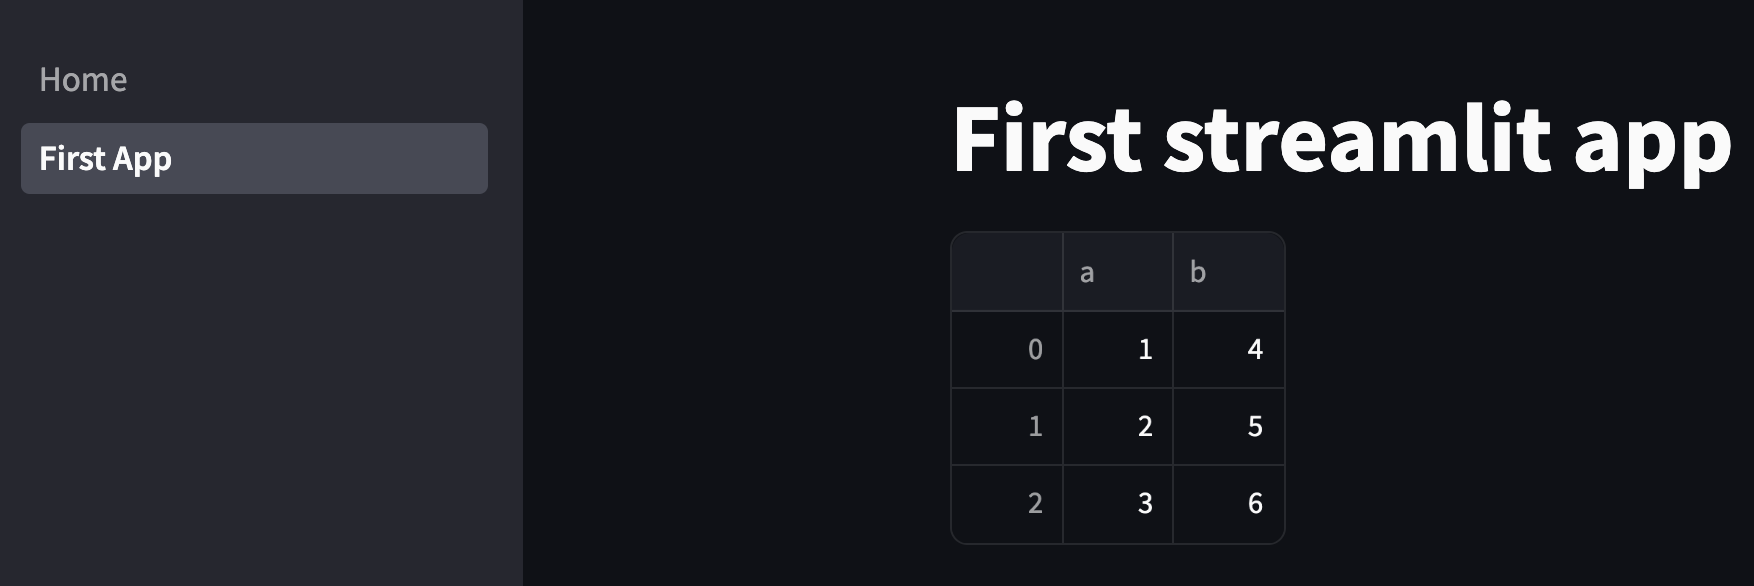
st.title("First streamlit app")
st.write(pd.DataFrame({"a": [1, 2, 3], "b": [4, 5, 6]}))
After all of that, we can rebuild our container (make build) and start streamlit locally (make streamlit-local). However, you’ll get an error **ModuleNotFoundError**: No module named 'code_package'. This is because when we added our new cloud/util.py file, we’re now importing code from outside the streamlit
Once it’s up and running, you’ll see the google login button:
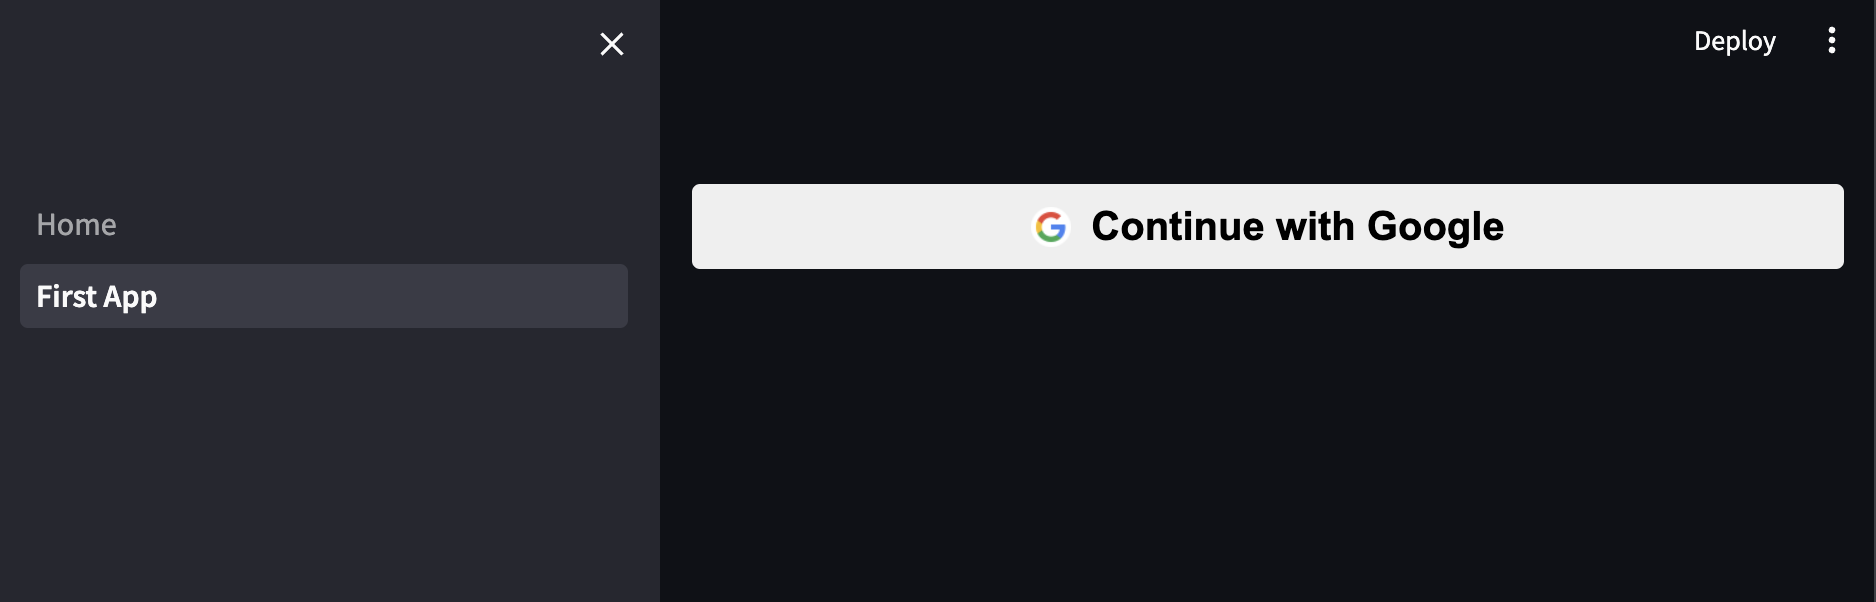
If you click on it and select your email address or any other one you added to the list of test users, then it should proceed successfully and show you your app!
Next, let’s get this working in the deployment. We can push our code to main to trigger the update. However, once it updates, we’ll find that the task doesn’t have permissions to read the OAuth API info from Parameter Store. To fix this, we go back to our streamlit-server task definition and make a new revision where we change Task role from None to a new ecsTaskRole that we need to create in the IAM console.
Go to the IAM Roles page, then create a new role for an AWS service, then select Elastic Container Service and then Elastic Container Service Task. Then for permissions, for now, I’ll just give it AmazonSSMReadOnlyAccess, which should provide read access to Parameter Store under the Systems Manager.
Then we can set the role in our new Task definition revision. Once that’s created, we have to update our service and set the Task definition revision to point to the newest one. Once that’s done and the service fully updated, the page should load with no permissions error.
However, there’s one more issue: if you do the OAuth flow, it’ll direct you to localhost:8501 in the popup window, but not actually redirect the base window to the deployed and unlocked app. To do so, we need to add the ALB URI to our list of Authorized Redirect URIs in the GCP console. You should already have http://localhost:8501, and you can add http://streamlit-alb-<aws numerical code>.us-east-1.elb.amazonaws.com. Finally, we have to make sure to update this in the JSON we have in Parameter Store as well. Now, everything should work!
As a follow-up step, you may have noticed a check for an env variable LOCAL_STREAMLIT in the google_oauth code. I made this as an override to remove OAuth locally for easier debugging and development. To enable it, we can add a new environment section to the streamlit and streamlit-local services in our docker-compose.yml:
version: '3'

services:
	streamlit:
		...
		environment:
      - LOCAL_STREAMLIT=1
		...
	streamlit-local:
		...
		environment:
      - LOCAL_STREAMLIT=1
		...
Then if you start your app locally, it should avoid the OAuth check even for apps that require it.
Custom domain and Certificates
The process of adding a custom domain to our streamlit deployment depends somewhat on where your domain is stored. At the moment, this section is under construction, but part 3 of the tutorial will work with the alb URI in place.