Final code structure overview
The code for this second part looks mostly similar to the second part with a new workflow, a new countdown subpackage, and a new batch.py util file. Sample code repo here.
sample-streamlit-deploy
    .github/workflows/
        custom-docker-push.yml
        docker-push.yml
        update-streamlit.yml
    .gitignore
    code_package/
        countdown/
            countdown.py
        streamlit/
            pages/*
            util/
                google_oauth.py
            Home.py
            requirements.txt
            start.sh
        util/
            batch.py
            cloud.py
    Dockerfile
    Makefile
    docker-compose.yml
    environment.yml
Overview
One of the limitations of streamlit is that it doesn’t play well with longer running computations. Even if it did, it’s bad UI design to have a web page block on a long running process, so in these cases, we’d prefer to have some way to launch jobs and later check on the results. When we first set up our streamlit deployment, we chose to push a container which could be run with an arbitrary command. This ends up also being useful as a container we can use for running jobs on AWS Batch or other containerized workflow tools.
Local Docker shell
Before we launch anything to run remotely, we want to augment our docker-compose and Makefile to allow for running an interactive shell within our docker container for easier debugging and development. First, in the docker-compose.yml, we’re going to add the following services for shells that use the remote and local-built docker images respectively:
version: '3'

services:

	...

	shell:
    image: <aws account id>.dkr.ecr.us-east-1.amazonaws.com/img_name
    stdin_open: true # docker run -i
    tty: true # docker run -t
    command: /bin/bash
    platform: linux/amd64
    volumes:
      - ./code_package/:/app/code_package/
			- ~/.aws/:/root/.aws/

  local-shell:
    image: img_name:latest
    stdin_open: true # docker run -i
    tty: true # docker run -t
    command: /bin/bash
    platform: linux/amd64
    volumes:
      - ./code_package/:/app/code_package/
			- ~/.aws/:/root/.aws/
Then, we can add new commands to the Makefile for these:
...

shell:
	docker-compose run shell

local-shell:
	docker-compose run local-shell
Then, we can try running make shell in our terminal, and if the image is already present from before, then a docker shell should start up! If you have to pull the image again, you may need to run make ecr-login first.
AWS Batch setup
For this tutorial, we’re going to use AWS Batch for running containerized jobs since it’s fairly easy to set up. However, other solutions like Argo may offer more flexibility around how images and resources are specified for better long-term use.
Let’s navigate to the Batch page on AWS and start by creating a new Compute environment. I left Fargate as default configuration and named mine fargate-cpu. I left the default service role, set 256 max vCPUs, and left all the networking settings as default.
Next, make a new job definition. I set name to sm-job in case I want to make different definitions later with different resource requirements. Before we finish setting this up, we’ll need to make a new IAM role for Batch job execution and modify our existing ecsTaskRole so that our batch jobs can interact with AWS services. I’ll start by granting AmazonS3FullAccess to ecsTaskRole because that gives us the ability to write job results somewhere so they can actually be read later.
Then, go to the IAM Roles page and make a new one for AWS Service then select Elastic Container Service and Elastic Container Service Task. I named the role batchExecutionRole and added the following permissions:
CloudWatchLogsFullAccessAmazonEC2ContainerRegistryReadOnly
Then once the role is created, we can go back to the job definition creation and add this as the Execution role. Then select the toggle for Assign public IP, and on the next page, add the full ECR URI for our docker image (<aws account id>.dkr.ecr.us-east-1.amazonaws.com/img_name) and clear the default command (set to []). Then, set the Job role configuration to ecsTaskRole. I left the default vCPUs of 1.0 and memory 2 GB, but these can be made higher if needed. The rest can be left as default.
Last, we have the job queue. For this, I set the name to sm-queue and the connected compute environment to fargate-cpu. Next, we can write some code to attempt launching a job. In code_package/util/batch.py, we can put the following code:
import boto3
from typing import Dict, List

def submit_batch_job(command: str, job_name: str, dependencies: List[str] = []):
    session = boto3.session.Session()
    batch = session.client("batch")
    submit_job_response = batch.submit_job(
        jobName=job_name,
        jobQueue="sm-queue",
        jobDefinition="sm-job",
        containerOverrides={"command": command.split(" ")},
        dependsOn=[{"jobId": dep, "type": "N_TO_N"} for dep in dependencies],
    )
    job_id = submit_job_response["jobId"]
    print(f"Submitted job {job_name} {job_id}")
    return job_id

def get_job_status(job_id: str) -> Dict:
    session = boto3.session.Session()
    batch = session.client("batch")
    describe_jobs_response = batch.describe_jobs(jobs=[job_id])
    return describe_jobs_response["jobs"][0]["status"]
To test this code, we can start a shell (make shell, though you may need make ecr-login and make img-pull first) and run python code_package/util/batch.py. If this succeeds, your terminal output should be something like: Submitted job test-job 69282bd1-6a50-40b7-8dec-5a87e9843135 and you should be able to go the AWS Batch Jobs page and see your job with logging output of hello! Assuming this works, you can remove those last few lines from code_package/util/batch.py.
Next, let’s add job submission to our streamlit app. First, let’s write “job code” in code_package/countdown/countdown.py:
import argparse
import pandas as pd
import time

parser = argparse.ArgumentParser()
parser.add_argument("seconds", type=int)
parser.add_argument("output_dir", type=str)
args = parser.parse_args()

print("Starting countdown")
for i in range(args.seconds, 0, -1):
    print(i)
    time.sleep(1)
print("Countdown finished")

pd.DataFrame({"seconds": [args.seconds]}).to_csv(args.output_dir + "/seconds.csv")
We can test this by running python code_package/countdown/countdown.py 4 "." in a local docker image shell. You should get a 4 second countdown followed by a CSV file being written locally to seconds.csv. Next, let’s set up a place for our job results to be written. First, we’ll make a new S3 bucket called varun-streamlit-apps with all settings as default. Then, let’s add a bunch of code to code_package/util/cloud.py:
import boto3
from typing import List
import yaml
from yaml.loader import SafeLoader

def get_aws_parameter(key):
    session = boto3.session.Session()
    ssm = session.client("ssm")
    response = ssm.get_parameter(Name=key, WithDecryption=True)
    return response["Parameter"]["Value"]

def bucket_key_from_s3_uri(s3_uri: str) -> str:
    parts = s3_uri.split("/")
    bucket, key = parts[2], "/".join(parts[3:])
    return bucket, key

def s3_uri_from_bucket_key(bucket: str, key: str) -> str:
    return f"s3://{bucket}/{key}"

def read_yml_from_s3(s3_uri: str):
    session = boto3.session.Session()
    s3 = session.client("s3")
    bucket, key = bucket_key_from_s3_uri(s3_uri)
    response = s3.get_object(Bucket=bucket, Key=key)
    return yaml.load(response["Body"], Loader=SafeLoader)

def write_yml_to_s3(yml: dict, s3_uri: str):
    session = boto3.session.Session()
    s3 = session.client("s3")
    bucket, key = bucket_key_from_s3_uri(s3_uri)
    s3.put_object(Bucket=bucket, Key=key, Body=yaml.dump(yml))

def s3_ls(s3_uri: str) -> List[str]:
    session = boto3.session.Session()
    s3 = session.client("s3")
    objects = []
    bucket, key = bucket_key_from_s3_uri(s3_uri)
    paginator = s3.get_paginator("list_objects_v2")
    pages = list(paginator.paginate(Bucket=bucket, Prefix=key, Delimiter="/"))

    for page in pages:
        for cur in page.get("CommonPrefixes", []):
            objects.append(s3_uri_from_bucket_key(bucket, cur["Prefix"]))
        for cur in page.get("Contents", []):
            # If the user manually creates the dir, then there is an obj representing the dir itself
            if cur["Key"] != key:
                objects.append(s3_uri_from_bucket_key(bucket, cur["Key"]))
    return objects
After this, we’ll need to add pyyaml and s3fs to our list of dependences in environment.yml. Then we can modify our code in code_package/streamlit/pages/1_First_App.py:
import os
import pandas as pd
import streamlit as st
import time
from code_package.streamlit.util.google_oauth import oauth
from code_package.util.batch import submit_batch_job, get_job_status
from code_package.util.cloud import s3_ls, read_yml_from_s3, write_yml_to_s3
RESULTS_DIR = "s3://varun-streamlit-apps/first_app/"
MAX_JOBS_TO_SHOW = 20
oauth()
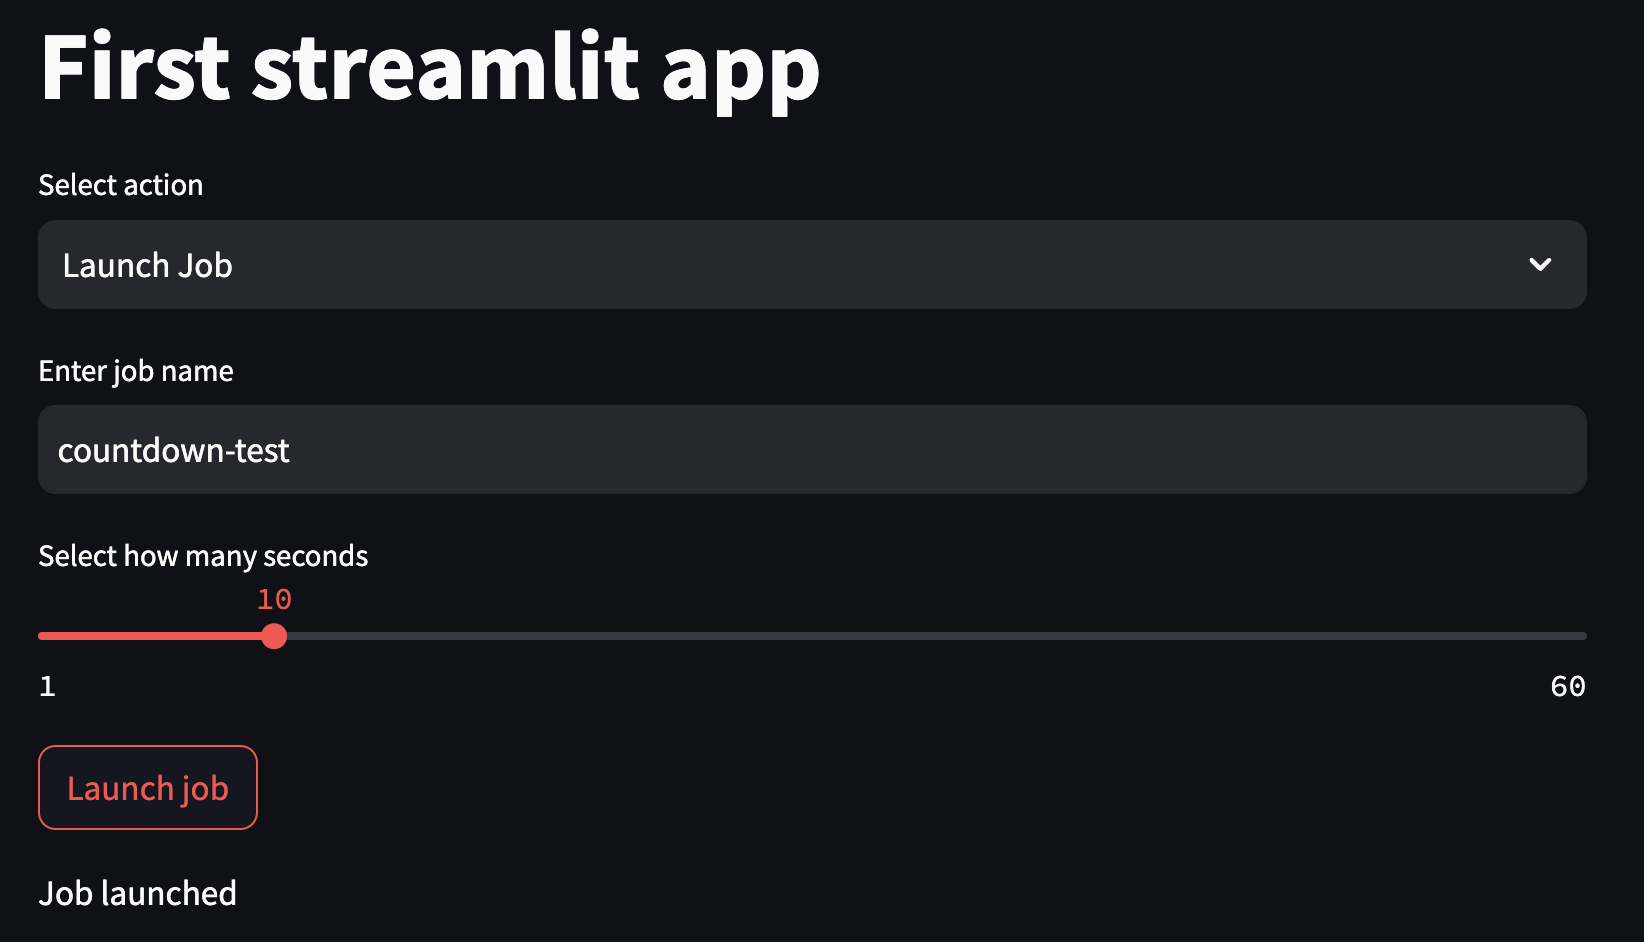
st.title("First streamlit app")
action = st.selectbox("Select action", ["Launch Job", "Check Job Status"])
if action == "Launch Job":
job_name = st.text_input("Enter job name", "countdown-test")
seconds = st.slider("Select how many seconds", 1, 60, 5)
if st.button("Launch job"):
timestamp = time.strftime("%Y-%m-%d_%H:%M:%S", time.localtime())
job_dir = os.path.join(RESULTS_DIR, timestamp + "_" + job_name)
job_id = submit_batch_job(
f"python code_package/countdown/countdown.py {seconds} {job_dir}",
job_name,
)
write_yml_to_s3(
{"job_id": job_id, "job_name": job_name, "seconds": seconds},
job_dir + "/job.yml",
)
st.write(f"Job launched")
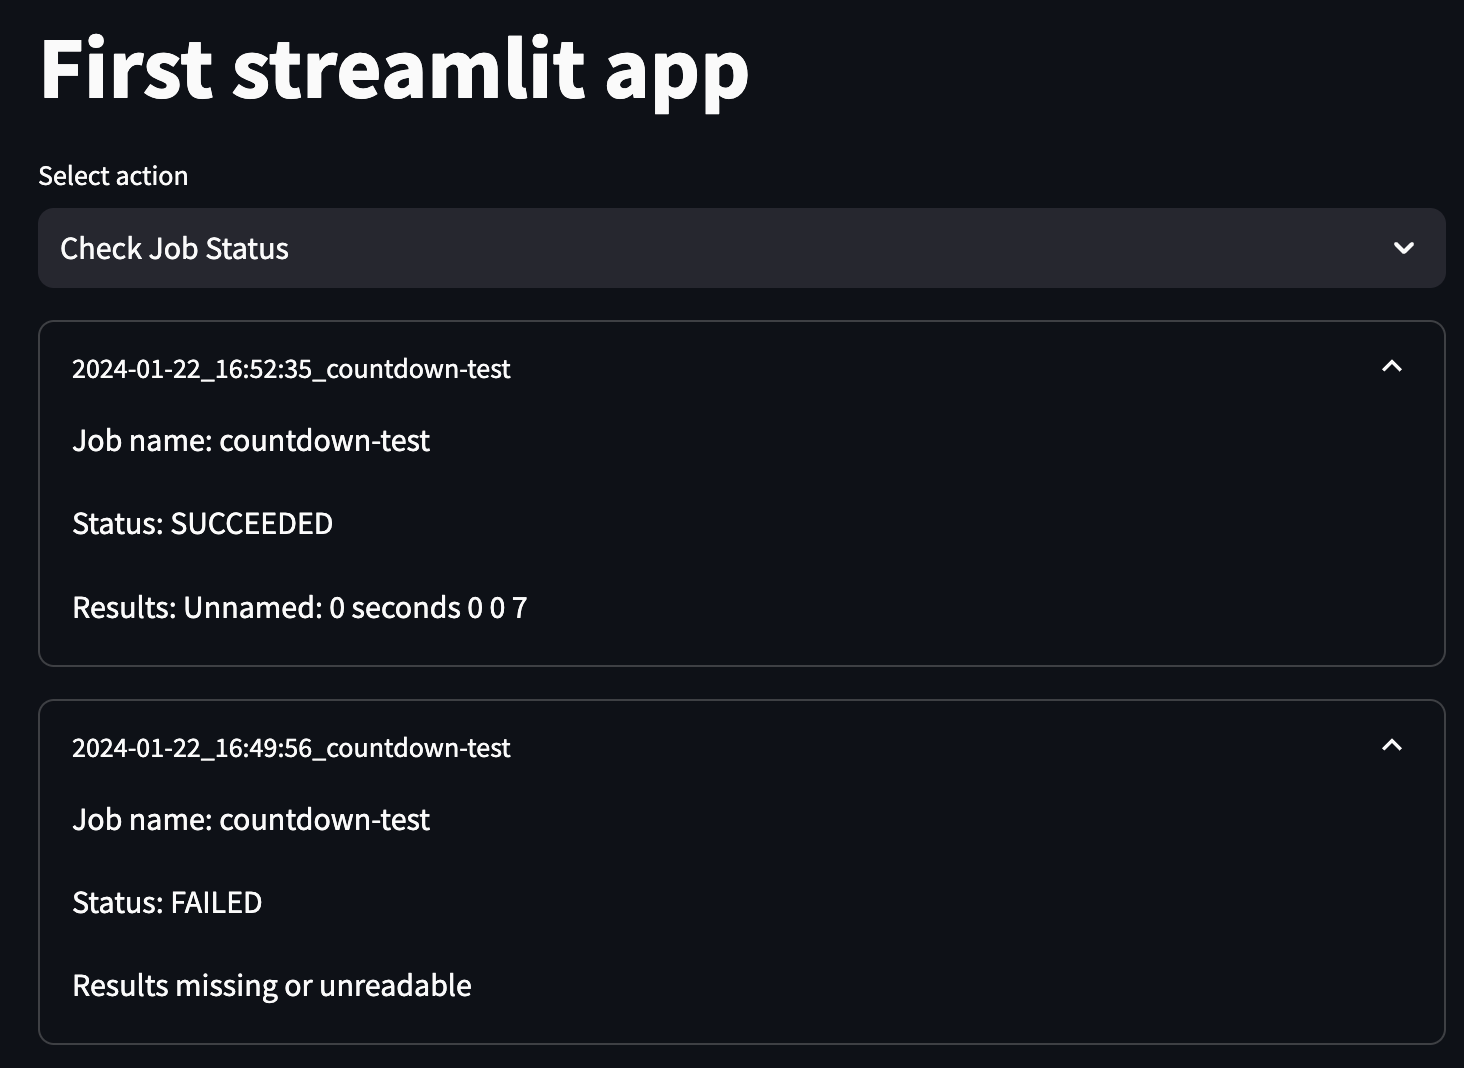
elif action == "Check Job Status":
jobs = s3_ls(RESULTS_DIR)
for job in list(reversed(jobs))[:MAX_JOBS_TO_SHOW]:
with st.expander(job.split("/")[-2]):
job_info = read_yml_from_s3(job + "job.yml")
st.write(f"Job name: {job_info['job_name']}")
st.write(f"Status: {get_job_status(job_info['job_id'])}")
try:
results = pd.read_csv(job + "seconds.csv")
st.write(f"Results: {results}")
except:
st.write("Results missing or unreadable")
We can start up our app and launch a job now!
However, when you go to status check it, the launched job will fail because the countdown code is not present in the remote image. For now, I’d recommend just pushing your code to main, though a later portion of the tutorial will show you another way to deal with this. Once we’ve pushed the new code and launched another job, we should see a success.
As you build out more complex jobs to launch, you can consider adding additional information to these job results tabs including links to the batch page, API-fetched logs, or more detailed results rendering.
Custom container pushing
In our previous example, we had to push our countdown code to main just to test if it worked on AWS Batch. What if we want to test out changes to job running code before deploying for everyone? One solution is to push a custom container with your testing code and point to that instead.
To ease the process of launching custom containers, we can add a new github action in .github/workflows/custom-docker-push.yml:
name: Custom Docker Image

on: issue_comment

jobs:
  build-and-push:
    name: Push Custom Docker Image
    if: ${{ github.event.issue.pull_request && contains(github.event.comment.body, '/push') }}
    runs-on: ubuntu-latest

    steps:
    - name: Checkout pull request
      uses: actions/checkout@v3
      with:
        ref: refs/pull/${{ github.event.issue.number }}/head
    - name: Configure AWS credentials
      uses: aws-actions/configure-aws-credentials@v1
      with:
        aws-access-key-id: ${{ secrets.AWS_ACCESS_KEY_ID }}
        aws-secret-access-key: ${{ secrets.AWS_SECRET_ACCESS_KEY }}
        aws-region: us-east-1

    - name: Login to Amazon ECR
      id: login-ecr
      uses: aws-actions/amazon-ecr-login@v1

    - name: Extract GitHub username
      id: extract-username
      run: echo "::set-output name=username::$(echo $GITHUB_ACTOR | tr '[:upper:]' '[:lower:]')"

    - name: Build and push Docker image
      env:
        ECR_REGISTRY: ${{ steps.login-ecr.outputs.registry }}
        ECR_REPOSITORY: ${{ secrets.REPO_NAME }}
        GITHUB_USERNAME: ${{ steps.extract-username.outputs.username }}
      run: |
        docker build -t $ECR_REGISTRY/$ECR_REPOSITORY:$GITHUB_USERNAME .
        echo "Pushing image to ECR..."
        docker push $ECR_REGISTRY/$ECR_REPOSITORY:$GITHUB_USERNAME
        echo "::set-output name=image::$ECR_REGISTRY/$ECR_REPOSITORY:$GITHUB_USERNAME"

    - name: comment on PR
      env:
        ECR_REPOSITORY: ${{ secrets.REPO_NAME }}
        GITHUB_USERNAME: ${{ steps.extract-username.outputs.username }}
      uses: actions/github-script@v5
      with:
        github-token: ${{secrets.GITHUB_TOKEN}}
        script: |
          github.rest.issues.createComment({
            issue_number: context.issue.number,
            owner: context.repo.owner,
            repo: context.repo.repo,
            body: `Pushed custom image to ${process.env.ECR_REPOSITORY}:${process.env.GITHUB_USERNAME}`
          })
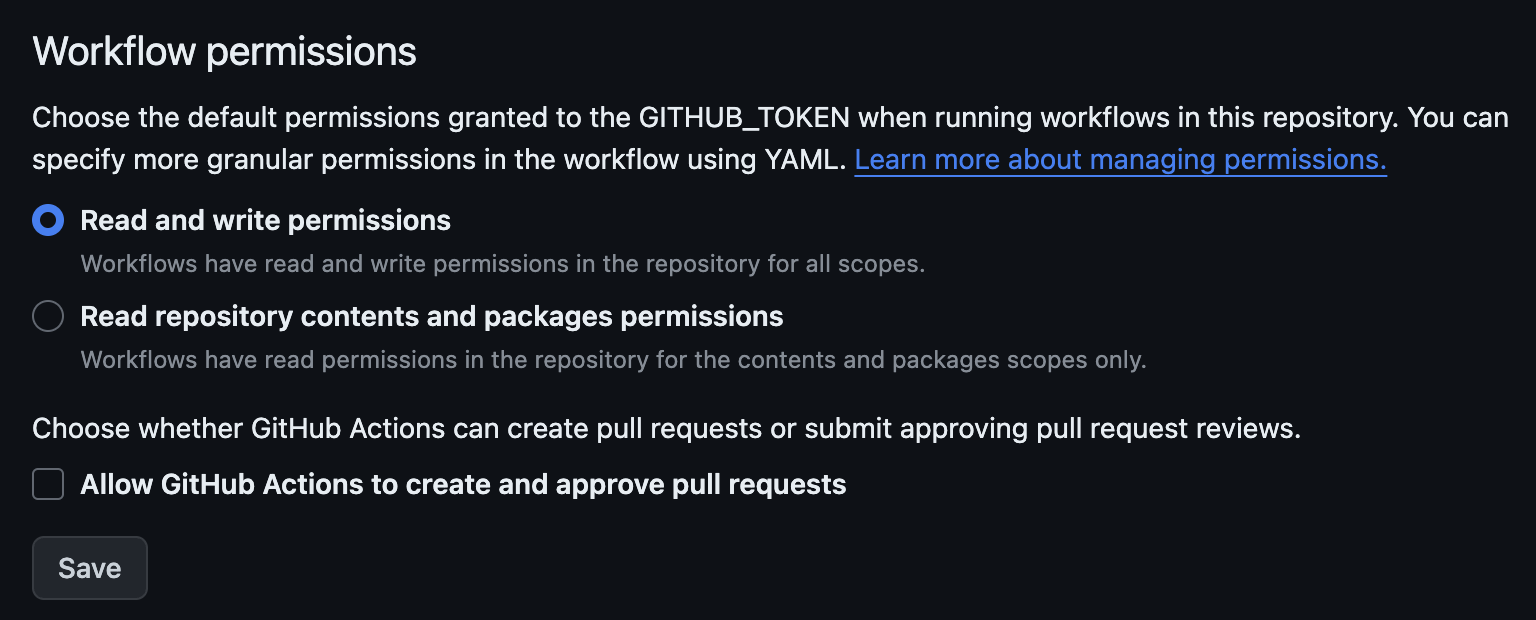
Then to allow the action to have proper permissions, we have to go to the Workflow Permissions section of the repository settings (under Actions then General). There, we want to grant read AND write permissions and save:
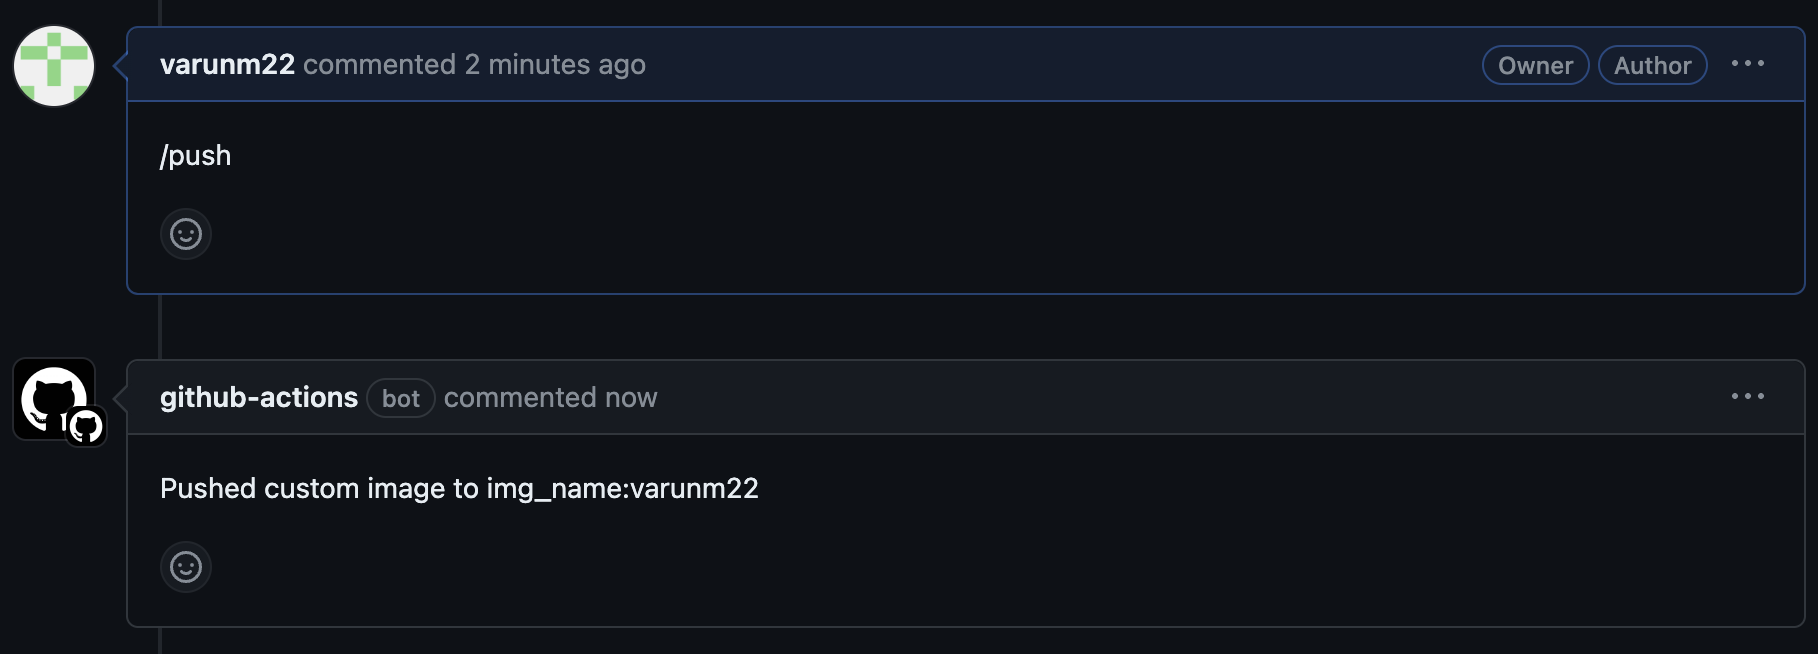
To make this work, you have to make sure your changes are done in branches and merged through PRs. In your PR, if you comment /push, then this action will push a custom built image from the PR code to our ECR repo but tagged with your username. For me, this is img_name:varunm22.
The job definition sm-job we set up above for Batch is associated with a particular docker image, so we’ll have to make another one to work with the newly tagged image. You can use all of the same settings except set the name to sm-job-varunm22 and suffix :varunm22 to the container URI. Then, let’s make a change to test this out.
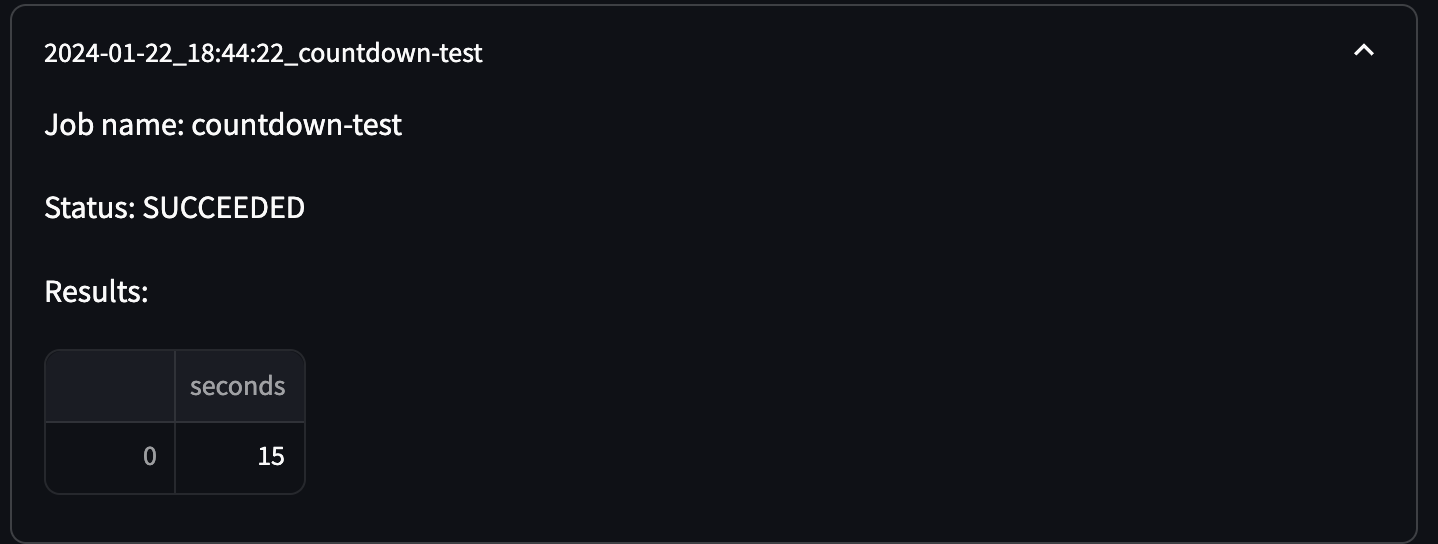
You may have noticed above that the Results rendering in the above screenshot (and ideally your local version) is a bit messy: Unnamed: 0 seconds 0 0 7. Let’s fix this in a new branch called fix-results-rendering. The first issue I want to fix is rendering the dataframe as such vs as text. We can do so by replacing the line st.write(f"Results: {results}") with:
st.write(f"Results:")
st.dataframe(results)
This we can test locally without a custom image, and we can already see the results look a little better:
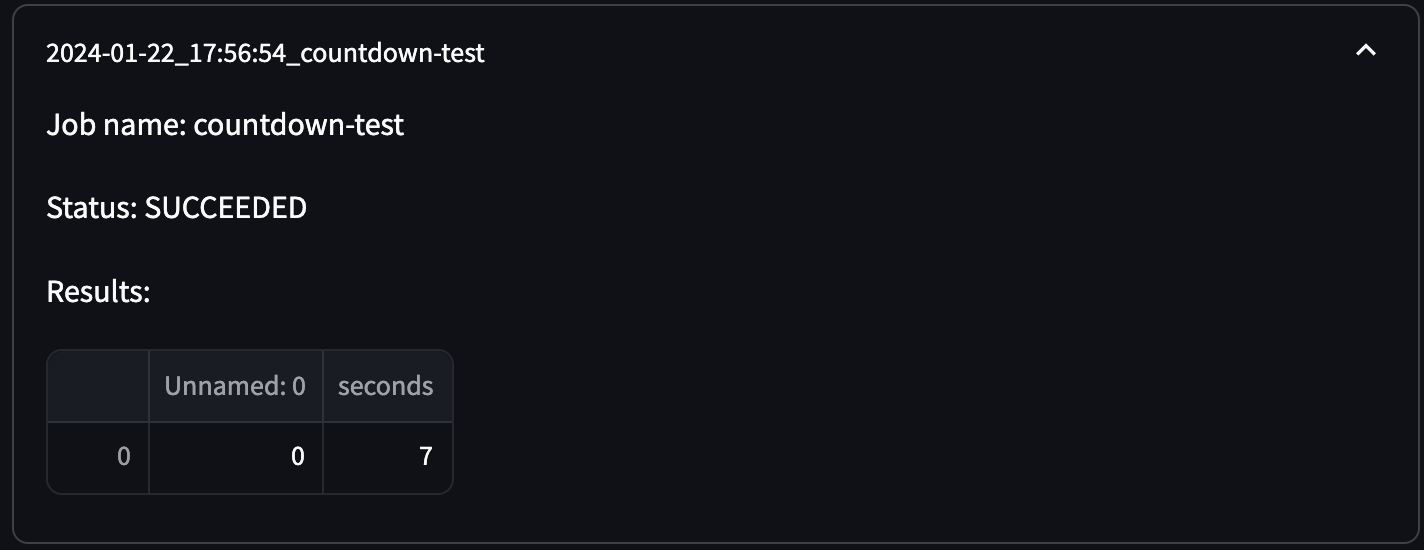
However, it seems we’re getting this extra Unnamed: 0 column. We could remove Unnamed: 0 by adding index_col=0 to where we read_csv in results rendering so that the written index column isn’t read as a separate one, but for the sake of this example, we’ll need to change our job code to not write it in the first place. In code_package/countdown/countdown.py, add index=False to the to_csv call in the last line, then push all these changes to your new branch. Then on Github, we can create a new PR and comment \push in it. If the workflow was set up correctly, you should see a new comment on the PR after a few minutes.
Then we can modify our submit_batch_job function to allow for custom tags:
def submit_batch_job(
    command: str, job_name: str, dependencies: List[str] = [], tag=None
):
    session = boto3.session.Session()
    batch = session.client("batch")
    job_definition = "sm-job"
    if tag:
        job_definition = f"{job_definition}-{tag}"
    submit_job_response = batch.submit_job(
        jobName=job_name,
        jobQueue="sm-queue",
        jobDefinition=job_definition,
        containerOverrides={"command": command.split(" ")},
        dependsOn=[{"jobId": dep, "type": "N_TO_N"} for dep in dependencies],
    )
    job_id = submit_job_response["jobId"]
    print(f"Submitted job {job_name} {job_id}")
    return job_id
Then in our app code, we can add our tag to the call to submit_batch_job by including an arg of tag="varunm22". If the image has been pushed (and you saw the relevant auto comment on the PR), then in our locally running app, we can submit a job. When it finishes running (and hopefully succeeds), you’ll see a results dataframe with no visible index columns:
If you like how that looks, you can merge into master!
Follow up
If we decided we needed several job definitions for different resource allocations crossed with custom containers per employee, we might end up with a lot of job definitions to keep track of. It may be possible to simplify this setup through Terraform or use a more flexible containerized workflow tool like Argo, but those are out of the scope of this tutorial.